
This post is a long time in coming, and I apologize for that.
My apartment that we live in and own came with 3 bedrooms. The upper floor also has 3 bedrooms, but we rent it out. In order to make it a rental unit, we blocked off the stairs at the second floor landing, and opened a door from the unit to a preexisting outside staircase.
I had the smallest bedroom to myself. At first my kids all shared a bedroom and there was a home office/guest room, but my oldest needed his own space and just moved himself in there one day, and we let him have it. Then my younger 3, 1 boy and 2 girls, were sharing a bedroom.
As my kids got older, it stopped being so appropriate for the girls to share a room with their brother, but we didn’t really have a space to move him. But we’d long toyed with the idea of turning the staircase to the second floor, that now led to nowhere, and was just used as a storage area, into a loft bedroom, and moving my son in there.
2 1/2 years ago, I bit the bullet and did it. It took a few months, a lot of hard work, and I ended up being so injured from doing the project mostly on my own (because my sons were busy with schoolwork and other things) that it took me a while to recover, but my son now has his own bedroom and I think it is beautiful.
I think my original estimate was that it would cost $2900, but it ended up costing $4000, because the wood ended up being a lot more than I originally thought it would be, but I think that that is an astoundingly low price for having an entirely new bedroom in my house, and I’m sure paying to have it done would have cost significantly more.
This price doesn’t include the furnishing or the air conditioning.
The reason it took me a while to post about it was because even after the room was built, it took another two years to completely finish the room as we wanted it to be.
Putting in an air conditioning unit was important to me since it didn’t have any windows, and I thought good fresh clean air was important (not to mention that that was really hot) but saving up for that took a little time.
Additionally, for about 2 years after the room was built my son slept in a mattress on the floor of his room, because installing a bed there was another project, and after how much my body hurt me doing the original build I was not willing to do it on my own, and my sons were very busy, so it took until they were free for us to finally get it done. Once that was done, then we got the rest of the furniture to make it all finished.
Ok, so how did we make the bedroom?
After designing the room and getting advice from professionals to ascertain its safety, we were ready to start.
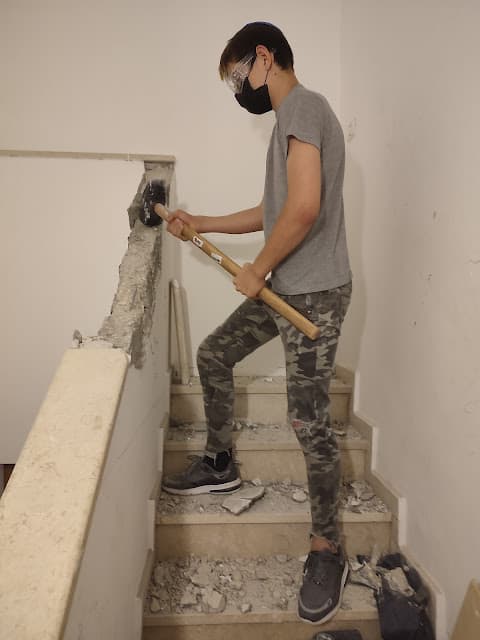
As I shared in this post, first we used a sledgehammer to break down the cement banister leading up to the upper floor, so that it didn’t go any higher than the height of the top stair/landing. We made sure not to knock the banister down lower than that, because we’d be using it as an additional support for the floor.
We weren’t able to do it all with a sledgehammer since it also contained an iron rebar, but we borrowed an angle grinder with an attachment for cutting metal from a neighbor to both cut the rebar and flatten it as much as possible.
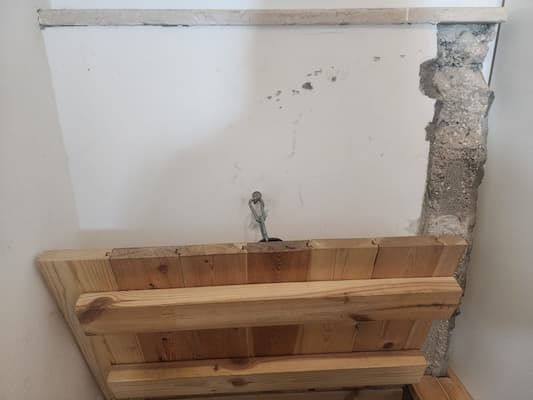
The floor would be on top of wooden thick beams that were drilled into the cement wall with strong anchors. Even though I knew how to do it, for my own peace of mind I wanted to pay someone to attach the wooden beams, because I wanted to make sure that that was as safe as possible, since it was the base of the entire project.
This cost me only $70 and it was worth it for me.
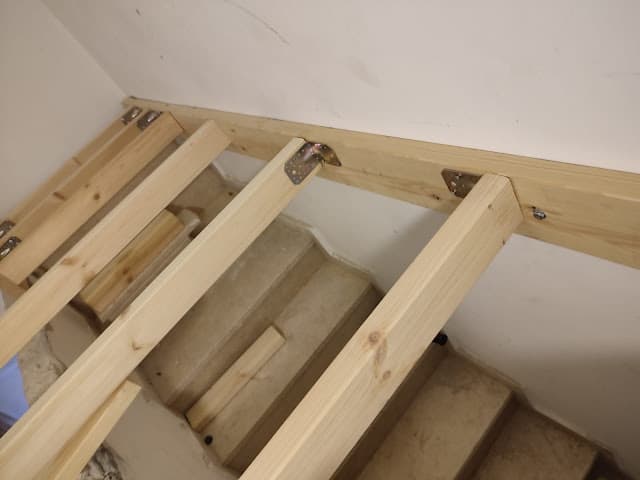
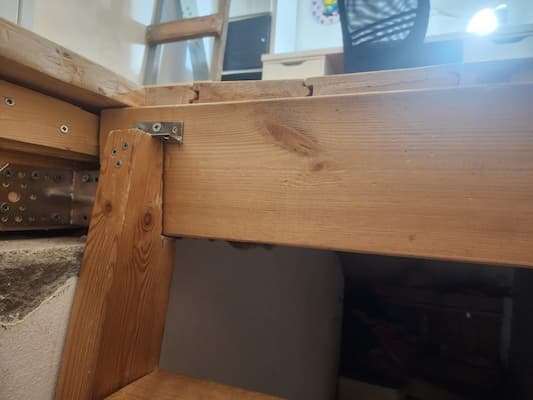
Then we took other slightly smaller beams and put them between the wall mounted beams, securing them with strong metal brackets. They went across the length of the future room, while leaving space for where a trap door would go.
The trap door was a bit complicated. We wanted to have something large enough that we could get furniture in and out of the room, but not take up too much of the floor with a trap door.
I ended up using math (Pythagorean theorem specifically) to figure out what the dimensions of the trap door needed to be to be able to fit a full sized mattress diagonally up and into the room, and then gave it a bit more space to be generous.
Then we had to figure out how to make the trap door strong enough to stand on. This meant that it had to be decently thick, but not too heavy to lift. It also needed to be balanced on wooden beams strong enough to support its heavy weight as well as the weight of a person standing on it. (That is why the beams get closer and closer together in the image above.) The cement banister was also helpful in this.
Also because of how heavy the trapdoor was, I needed something to firmly secure it to the wall when it was open, because I couldn’t chance it falling down and hurting someone. So we drilled an eye hook into the wall and use a small caribener to hold it open when needed.
The ladder was possibly even more complicated than the trap door (and the trap door did complicate it a bit).
Needing to figure out the exact angle of the wooden beams used for the ladder so that the ladder lay flush against the wooden beam holding it up and while also laying flush against the bottom step of the stairwell was challenging and took multiple tries to get right.
It also couldn’t be too wide, because it needed to allow us to pass by on one side to be able to access the area under the room, because that would be our storage area. Right now it just barely fits fat me squishing through, but everyone else is able to get through.
Then figuring out the angle of the steps on the ladder was another complicated matter and took a few tries, and then even once I secured them they started weakening, so I ended up needing to use metal brackets there as well.
Connecting the ladder to the upper beam and to the floor was another fun part.
All in all, I absolutely hated everything about the ladder… even though you wouldn’t think it would be that complicated.
Of course, installing the flooring was also complicated. Did I mention that nothing about this room wasn’t complicated?
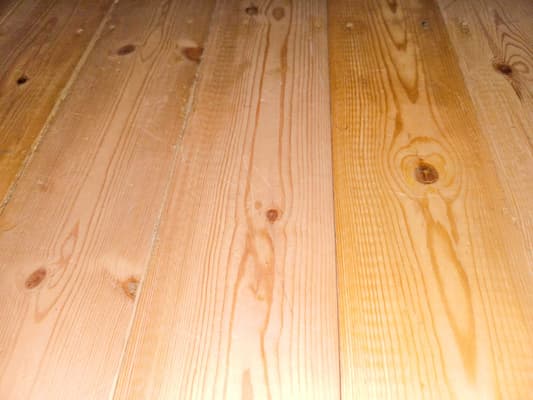
We used tongue and groove flooring, which is made of thick wooden beams that have a tongue on one side and a groove on the other, so they fit snugly against each other. It was perfect for the space, but still complicated to install in such a confined area.
First, we had to get large wooden beams up above the support beams the floor would rest on, and cut them exactly to size so there wouldn’t be any gaps between them and the walls on either end.
Once that was done, we needed to fit the tongues into the grooves. We had to figure out how much to cut the side piece because the floor wasn’t the perfect width for only full beams. Additionally, because the width of the room was so limited, we couldn’t assemble the floor flat. Instead, we had to bow the boards upward until all the beams were locked together, and then press them flat to make it a floor.
Despite the interlocking boards, there were still little spaces between them. Usually this is prevented by hammering the pieces together from the side, but there was no room to do this for most of the boards because of the narrow confines of the room. To fill in these spaces, I cut small pieces of wood (off the scraps) using my oscillating tool, and then hammered them into place in the gaps and securing them with wood glue. This took a decent amount of time, because I didn’t want there to be large grooves for things in the floor to fall into.
The next part was theoretically the easiest but hurt my back the most because of how much bending over it involved.
I used an electric sander (making sure to wear a mask to prevent breathing in the dust) to make sure there were no splinters on the floor. I did this very thoroughly.
Once that was done, I varnished the floor. I think I used a water based polyurethane type varnish, but it was 2 years ago so I don’t remember exactly. I’m pretty sure once it dried, it needed to be sanded lightly and varnished yet again.
And with that, the room was finished. At least from my end.
Since this would be a bedroom, it was important that there would be electrical outlets in it, but I knew better than to try installing electrical wiring myself. I hired an electrician to bring electricity into the room, and to keep down the costs the wiring is outside the wall but covered in plastic sleeve type things to protect it and make it look better. The electrician also installed a light fixture.
To be honest, I don’t remember how much I paid the electrician, but I have a vague recollection that it was $500 but I could be far off.
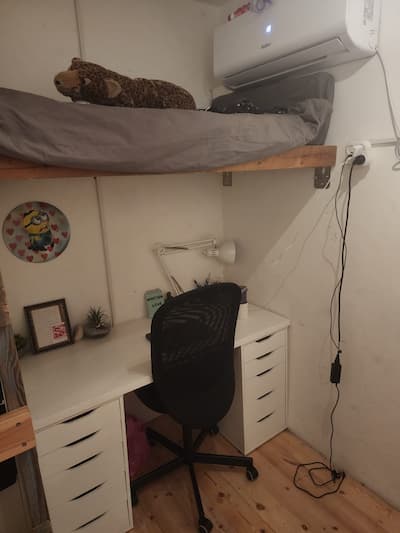
At this point my son brought up a mattress, a shelving unit, a small Ikea Kallax unit, a small table, and a chair.
And this was how his room was until a few months ago.
To finish his room, his bed needed to be turned into a loft bed. For this, we had two options.
The first option was to put his bed lengthwise in the room, since the room is longer that way. It would require a leg going down in the center of the room to hold one of the corners up and would take up floor space. The other option was to put it in widthwise, so the mattress fit exactly between the two walls.
But not quite exactly.
A standard mattress is about 2 or 3 inches longer than the width of the room. We tried shoving the mattress between to see if we could squish it to fit, but it simply wasn’t possible. What we ended up doing was getting a segmented Ikea mattress, meant to be used with expanding children’s beds, to put between the two walls. (If you can see, my son has the final segment sticking upwards.)
When my son moved out of the bedroom he shared with the girls, we took apart the triple bunk bed we’d built using the bed frame from our homemade loft bed we made when the kids were younger (yes, I know some of the images in that post don’t work). Since the bed frame was really strong, I decided to use it yet again as the base of my son’s new loft bed.
But this frame was too wide to put in the room, and so, when my son had the time to help me cut it shorter and rebuild it to fit his room, we attached it to the wall with strong metal brackets.
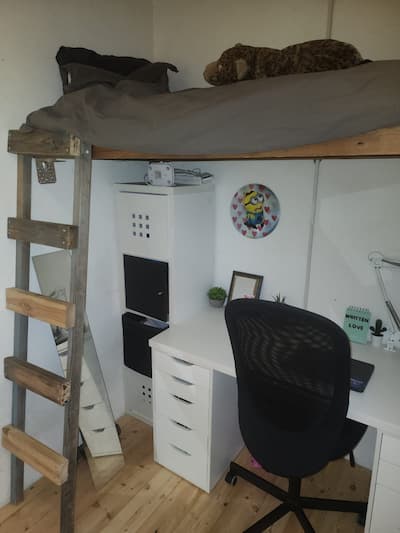
We then built a simple ladder and attached it to the bed (a much simpler one than the ladder to the room), and voila, we just needed to put on the mattress and the bed was finished.
Once that was done, we did all the actual building needing to be done for the room.
And now it was time to furnish it properly.
We went to Ikea and got my son a nice desk and rolling office chair to go under the bed.
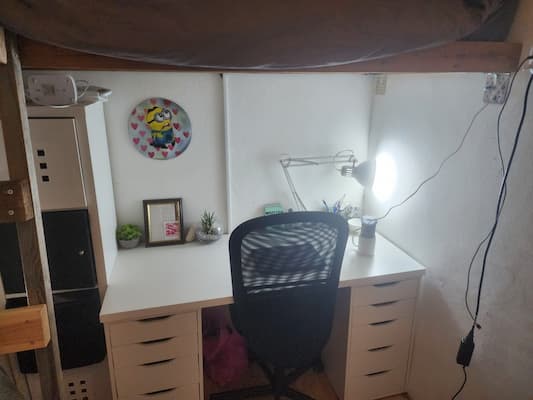
Because it was dark under there, we got him a bright desk lamp.
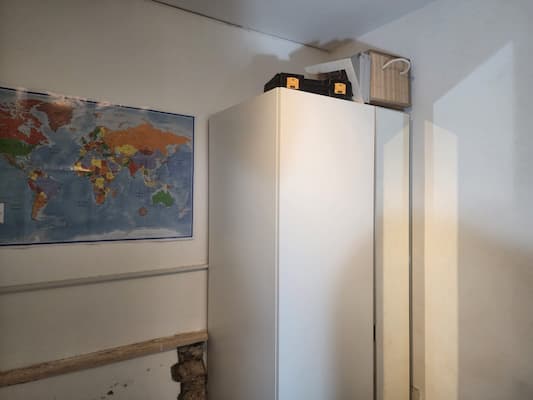
Last but not least, we got him a closet that took up as much space as possible between the trap door and the wall, on the side of the room opposite the bed.
There isn’t soo much floor space, but there is enough that when the trap door is down, he can put a mattress on the floor to host a friend for a sleepover.
Building the furniture up there in the confined space wasn’t the easiest, but once it was up, I think his room looks really awesome.
In many ways, I think it’s the nicest room in the house, even if it is the smallest.
And here is a video of the room, so you can see it all in one go.
I am so super proud of myself for this. It was one of the most challenging projects I took upon myself, but I did a smashing good job, if I may say so myself. And the fact that I did it for a fraction of what it would cost me to get it professionally done, but it still looks professional (other than the part of the bannister that is sticking out of the wall that we never fully removed) is such an awesome feeling.
My son loves having his own room, and turning what was just empty wasted space into a bedroom is really amazing.
Have you ever done a construction project yourself? What did you do? Any idea how much getting something like this done professionally would cost (in dollar equivalent)? Any further questions about how we built this?


5 Responses
Awesome. Well done!
it’s a great idea, but as someone who regularly fell out of the top bunk as a child, even with guard rails, I’m a little worried about falls.
Wow!!! what a wonderful accomplishment for you, and great experience for the kids too, learning that so much is up to each person, and they have the power to get things done, asking for help and realizing their dream. wow for you!!❤️👍
I’m glad he has his own room now but I don’t think you should’ve been the one building it with your health issues. Please take it easy.
Thank you for your care and concern.
This room was finished about 2 years ago other than installing the bed and for that I didn’t do the physical labor. It was necessary and I didn’t have the funds to pay a professional to do it, but it did injure me. Do I regret it? No. Was it painful, yes. Did it cause lasting damage to me? No, just about 2 weeks recovery time. Won’t be doing it again. Learned my lesson and will have my kids do it more if something like this comes up again.